Changing SSID and Network Password
Latest update: August 2013
In this tutorial, we will show you how to change your FlashAir SSID and network password via an Android Application. We will use command.cgi and config.cgi to do this.
We will show you how to create an Android app that will allow you to view your current FlashAir SSID and password as well as set a new SSID and password. We will set up two separate screens for this application.
The first screen will contain two
Button objects:
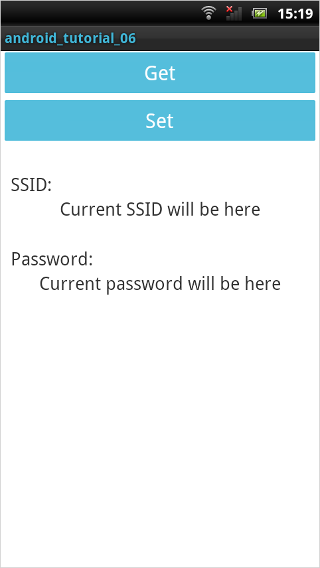
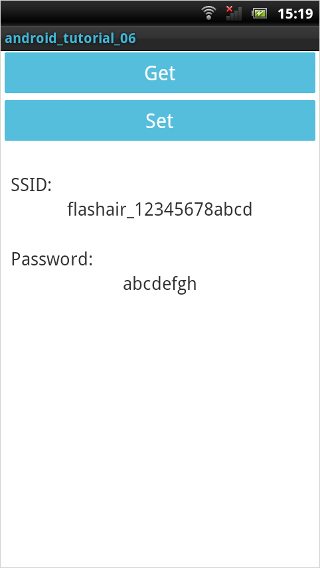
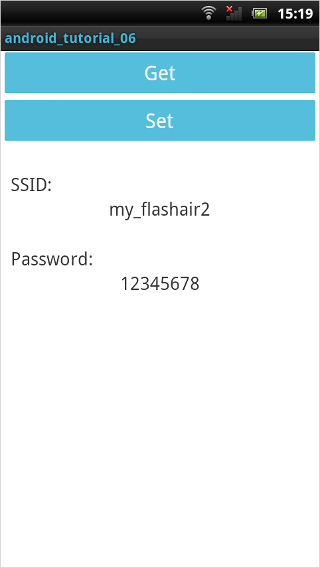
Pressing "Get" will allow you to view your current SSID and password in the text fields below:
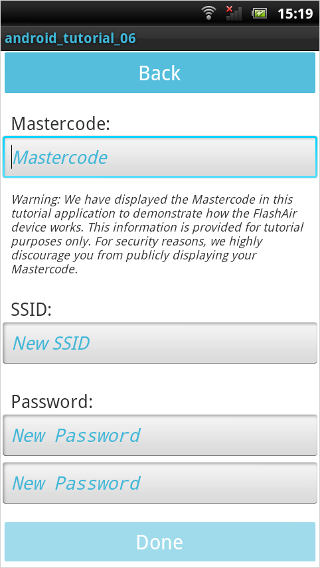
Pressing "Set" will send you to the next screen, where you can set your new SSID and password:
We will need to create the following files in order to write this application:
- MainActivity.java
- activity_main.xml
- SetScreenActivity.java
- activity_set_screen.xml
Important: Please note that your project contains a
file called
AndroidManifest.xml. This file gives your application particular permissions. By
default,
applications are not permitted to access the internet. The path to this file should look
something
like:
[Project_Folder]/AndroidManifest.xml
You will need to add the following lines of code into your
AndroidManifest.xml in order for this application to work:
<uses-permission android:name="android.permission.INTERNET" />
First, we will write the activity_main.xml file that determines the layout of our Android App. This can be found in your layout folder. The path to this file should look something like: [Project_Folder]/res/layout/activity_main.xml
Creating the Get Screen Layout
You want the activity_main.xml file to look like this:
activity_main.xml
<LinearLayout xmlns:android="http://schemas.android.com/apk/res/android"
    xmlns:tools="http://schemas.android.com/tools"
    android:layout_width="fill_parent"
    android:layout_height="match_parent"
    android:gravity="center_horizontal"
    android:orientation="vertical"
    tools:context=".MainActivity" >

    <Button
        android:id="@+id/button1"
        android:layout_width="match_parent"
        android:layout_height="wrap_content"
        android:cacheColorHint="#00000000"
        android:text="Get"
        android:textColor="@android:color/white"
        android:textSize="20sp" />

    <Button
        android:id="@+id/button2"
        android:layout_width="match_parent"
        android:layout_height="wrap_content"
        android:cacheColorHint="#00000000"
        android:text="Set"
        android:textColor="@android:color/white"
        android:textSize="20sp" />

    <TextView
        android:id="@+id/SSIDlabelView"
        android:layout_width="wrap_content"
        android:layout_height="wrap_content"
        android:layout_gravity="left"
        android:layout_marginTop="25dp"
        android:paddingLeft="10dp"
        android:text="SSID:"
        android:textSize="18sp" />

    <TextView
        android:id="@+id/textView4"
        android:layout_width="wrap_content"
        android:layout_height="wrap_content"
        android:textSize="18sp"
        android:text="Current SSID will be here" />

    <TextView
        android:id="@+id/passwordView"
        android:layout_width="wrap_content"
        android:layout_height="wrap_content"
        android:layout_gravity="left"
        android:layout_marginTop="25dp"
        android:paddingLeft="10dp"
        android:text="Password:"
        android:textSize="18sp" />

    <TextView
        android:id="@+id/textView5"
        android:layout_width="wrap_content"
        android:layout_height="wrap_content"
        android:textSize="18sp"
        android:text="Current password will be here" />

</LinearLayout>
Creating the Set Screen Layout
Next, we will edit the activity_set_screen.xml file that determines the layout of the screen where you can set a new SSID and password. This screen will consist of four editable text fields where you will input the necessary information to make network changes. Due to the way the fields have been set in this .xml file, a keyboard will pop up each time the user selects one of the text input fields.
This file can also be found in your layout folder. The path to this file should look something like: [Project_Folder]/res/layout/activity_set_screen.xml
activity_set_screen.xml
<LinearLayout xmlns:android="http://schemas.android.com/apk/res/android"
    xmlns:tools="http://schemas.android.com/tools"
    android:layout_width="fill_parent"
    android:layout_height="match_parent"
    android:gravity="center_horizontal"
    android:orientation="vertical"
    tools:context=".MainActivity" >

    <Button
        android:id="@+id/button1"
        android:layout_width="match_parent"
        android:layout_height="wrap_content"
        android:cacheColorHint="#00000000"
        android:text="Back"
        android:textColor="@android:color/white"
        android:textSize="20sp" />

    <TextView
        android:id="@+id/mastercodeView"
        android:layout_width="wrap_content"
        android:layout_height="wrap_content"
        android:layout_gravity="left"
        android:layout_marginTop="12dp"
        android:paddingLeft="10dp"
        android:text="Mastercode:"
        android:textSize="18sp" />

    <EditText
        android:id="@+id/editMC"
        android:layout_width="match_parent"
        android:layout_height="wrap_content"
        android:ems="10"
        android:hint="Mastercode"
        android:inputType="text"
        android:textStyle="italic" />

    <TextView
        android:id="@+id/warningView"
        android:layout_width="wrap_content"
        android:layout_height="wrap_content"
        android:layout_gravity="left"
        android:layout_marginTop="8dp"
        android:paddingLeft="10dp"
        android:text="Warning: We have displayed the Mastercode in this tutorial application to demonstrate how the FlashAir device works. This information is provided for tutorial purposes only. For security reasons, we highly discourage you from publicly displaying your Mastercode."
        android:textSize="12sp"
        android:textStyle="italic" />

    <TextView
        android:id="@+id/SSIDlabelView"
        android:layout_width="wrap_content"
        android:layout_height="wrap_content"
        android:layout_gravity="left"
        android:layout_marginTop="20dp"
        android:paddingLeft="10dp"
        android:text="SSID:"
        android:textSize="18sp" />

    <EditText
        android:id="@+id/editText1"
        android:layout_width="match_parent"
        android:layout_height="wrap_content"
        android:ems="10"
        android:hint="New SSID"
        android:inputType="text"
        android:textStyle="italic" >

    </EditText>

    <TextView
        android:id="@+id/passwordView"
        android:layout_width="wrap_content"
        android:layout_height="wrap_content"
        android:layout_gravity="left"
        android:layout_marginTop="20dp"
        android:paddingLeft="10dp"
        android:text="Password:"
        android:textSize="18sp" />

    <EditText
        android:id="@+id/editText2"
        android:layout_width="match_parent"
        android:layout_height="wrap_content"
        android:ems="10"
        android:hint="New Password"
        android:inputType="textPassword"
        android:textStyle="italic" />

     <EditText
         android:id="@+id/editText3"
         android:layout_width="match_parent"
         android:layout_height="wrap_content"
         android:ems="10"
         android:hint="New Password"
         android:inputType="textPassword"
         android:textStyle="italic" />

    <Button
        android:id="@+id/button2"
        android:layout_width="match_parent"
        android:layout_height="wrap_content"
        android:layout_marginTop="12dp"
        android:cacheColorHint="#00000000"
        android:text="Done"
        android:textColor="@android:color/white"
        android:textSize="20sp" />

</LinearLayout>
Creating the Get Screen
First, we will initialize the two
Button objects that will allow you to get and set your SSID and password and
set their
behaviors. We will also implement the fetching SSID and network password portion of this
application
here.
Initialization
We will start by declaring member variables and setting up the screen format. Then we will
declare
and set an
onClickListener for each
Button. Since their behavior is different, we will have to write two separate
onClick() functions:
MainActivity.java (1)
public class MainActivity extends Activity {

    TextView SSID;
    TextView password;
    Button getButton;
    Button setButton;

    @Override
    protected void onCreate(Bundle savedInstanceState) {
        super.onCreate(savedInstanceState);
        setContentView(R.layout.activity_main);
        getWindow().setTitleColor(Color.rgb(65, 183, 216));
        getButton = (Button)findViewById(R.id.button1);
        setButton = (Button)findViewById(R.id.button2);
        getButton.getBackground().setColorFilter(Color.rgb(65, 183, 216), PorterDuff.Mode.SRC_IN);
        setButton.getBackground().setColorFilter(Color.rgb(65, 183, 216), PorterDuff.Mode.SRC_IN);
        try {
            getButton.setOnClickListener(new View.OnClickListener() {
                @Override
                public void onClick(View v) {
                    // Set button to show current SSID and Password
                    getSSID();
                    getPassword();
                }
            });
        } catch(Exception e) {
            Log.e("ERROR", "ERROR: " + e.toString());
            e.printStackTrace();
        }
        try {
            setButton.setOnClickListener(new View.OnClickListener() {
                @Override
                public void onClick(View v) {
                    // Set button to start new intent to allow new SSID and password input
                    Intent setSSIDPassword = new Intent(getBaseContext(), SetScreenActivity.class);
                    MainActivity.this.startActivity(setSSIDPassword);
                }
            });
        } catch(Exception e) {
            Log.e("ERROR", "ERROR: " + e.toString());
            e.printStackTrace();
        }
    }


    @Override
    public boolean onCreateOptionsMenu(Menu menu) {
        // Inflate the menu; this adds items to the action bar if it is present.
        getMenuInflater().inflate(R.menu.main, menu);
        return true;
    }
In lines 18-25, we set the click listener for the
getButton. When this
Button is clicked, it calls a function that will attempt to fetch the current
SSID of
the FlashAir and a then another function that attempts to fetch the current network
password
of the FlashAir (both are implemented below).
In lines 33-38, we set the click listener for the
setButton. As the SSID and password are set using another
class with a separate screen, this listener merely sets an
Intent to start the next screen. No additional information needs to be passed
to the next
Activity, so we will not be sending any extra
Bundle data.
Getting the SSID
The
getSSID() function called in the function above is the function that handles
requesting
and fetching the current SSID from the FlashAir device. The SSID of a FlashAir device is
not
guaranteed to have a fixed length (it can be up to 32 characters).
We will use the following CGI command to get the current SSID:
-
command.cgiwithop=104-
The command will look like this:
http://flashair/command.cgi?op=104 -
The command will return the following information about the directory:
<SSID>
-
The command will look like this:
To execute this CGI command, we will reuse the FlashAirRequest.java file from Android Tutorial 3: Downloading Content:
MainActivity.java (2)
    public void getSSID() {
        new AsyncTask<String, Void, String>(){
            @Override
            protected String doInBackground(String... params) {
                return FlashAirRequest.getString(params[0]);
            }
            @Override
            protected void onPostExecute(String currentSSID) {
                SSID = (TextView)findViewById(R.id.textView4);
                SSID.setText(currentSSID);
            }
        }.execute("http://flashair/command.cgi?op=104");
    }
Getting the Network Password
The
getPassword() function called in the
onClick() function above handles requesting and fetching the current network
password
from the FlashAir device. The network password of a FlashAir device is not guaranteed to
have
a fixed length (it can be up to 64 characters).
We will use the following CGI command to get the current network password:
-
command.cgiwithop=105-
The command will look like this:
http://flashair/command.cgi?op=105 -
The command will return the following information about the directory:
<networkPassword>
-
The command will look like this:
To execute this CGI command, we will reuse the FlashAirRequest.java file from Android Tutorial 3: Downloading Content:
MainActivity.java (3)
    public void getPassword() {
        new AsyncTask<String, Void, String>(){
            @Override
            protected String doInBackground(String... params) {
                return FlashAirRequest.getString(params[0]);
            }
            @Override
            protected void onPostExecute(String currentPassword) {
                password = (TextView)findViewById(R.id.textView5);
                password.setText(currentPassword);
            }
        }.execute("http://flashair/command.cgi?op=105");
    }
Now we will write the
SetScreenActivity, which handles all of the user interaction after the
setButton is pressed.
Creating the Set Screen
Warning: In order to set a new SSID or network
password on your FlashAir device, you will
need the Mastercode for your FlashAir device. This can be found by inserting your FlashAir
into
a PC or Mac and opening the CONFIG file of the FlashAir device. The CONFIG file is found in
the
"/SD_WLAN/" directory of the FlashAir device and should be opened in a text editor. You can
check
the Mastercode only when you finished FlashAir initial setting. There are hidden attributes
attached
to this directory, therefore we will use tools to handle this hidden folder.
The Mastercode will be listed in this file:
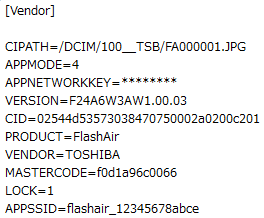
Once you have the Mastercode, you will be able to use the config.cgi commands.
Initialization
We will set up two buttons for this screen: one to allow the user to go back to the first
screen
(cancelling any input on this screen) and another to submit the new SSID and network
password
to the FlashAir. This second
Button will be labelled 'Done' and will be disabled until the user has typed
input into
all of the text fields.
As this new screen requires the user to input text, we will initialize
EditText fields for the user to type into as well as a
TextWatcher that will monitor the input fields. We will need to have a total
of four editable
text fields, one each for the Mastercode, new SSID, new network password, and a
confirmation
of the new network password (to avoid typos). We will override the
TextWatcher class to create a custom
fieldWatcher. Our
fieldWatcher will check if all the
EditText fields contain some typed input and will then enable the
Button that allows the user to submit the CGI command.
SetScreenActivity.java (1)
public class SetScreenActivity extends Activity {

    EditText mastercodeField;
    EditText SSIDfield;
    EditText passwordField;
    EditText passwordField2;
    Button backButton;
    Button doneButton;
    String newSSID = "";
    String newPassword = "";
    String newPassword2 = "";
    String mastercode = "";
    Boolean SSIDset = false;
    Boolean passwordSet = false;
    TextWatcher fieldWatcher = new TextWatcher(){
        @Override
        public void afterTextChanged(Editable e) {
            if(mastercodeField.getText().toString().isEmpty()
               || SSIDfield.getText().toString().isEmpty()
               || passwordField.getText().toString().isEmpty()
               || passwordField2.getText().toString().isEmpty() ) {
                doneButton.setEnabled(false);
            }
            else {
                doneButton.setEnabled(true);
            }
        }

        @Override
        public void beforeTextChanged(CharSequence cs, int start, int count, int after) {
            // Do nothing
        }

        @Override
        public void onTextChanged(CharSequence cs, int start, int before, int count) {
            // Do nothing
        }
    };
Lines 17-27 assign the
fieldWatcher to check if all the text fields have some input whenever the user
changes
the content in a text field. This check is what controls the
doneButton.
If the check determines that there is some input in each text field, the
doneButton will be enabled:
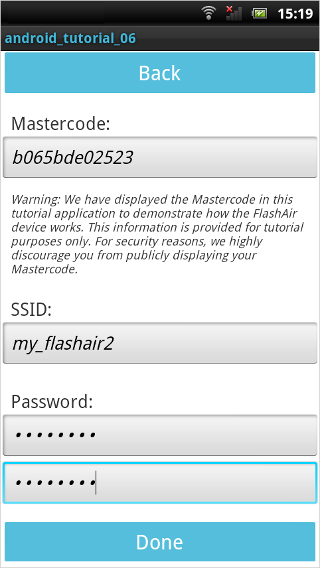
However, if the user clears the input in any of the text fields, the
doneButton will immediately be disabled:
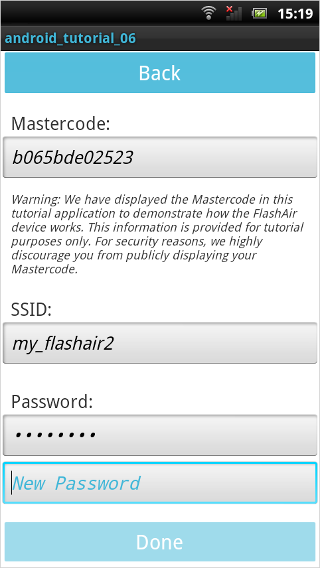
Now we will overwrite the
onCreate(Bundle savedInstanceState) function that initializes every
Activity. In this function, we will set the format for the window, identify
all the .xml
elements, and get the
Intent passed by
class MainActivity. We will also set the
fieldWatcher (which we wrote in the code above) to monitor each of the
EditText fields.
SetScreenActivity.java (2)
    @Override
    protected void onCreate(Bundle savedInstanceState) {
        super.onCreate(savedInstanceState);
        setContentView(R.layout.activity_set_screen);
        getWindow().setTitleColor(Color.rgb(65, 183, 216));
        backButton = (Button)findViewById(R.id.button1);
        doneButton = (Button)findViewById(R.id.button2);
        backButton.getBackground().setColorFilter(Color.rgb(65, 183, 216), PorterDuff.Mode.SRC_IN);
        doneButton.getBackground().setColorFilter(Color.rgb(65, 183, 216), PorterDuff.Mode.SRC_IN);
        doneButton.setEnabled(false); // Disable until text fields have been filled
        mastercodeField = (EditText)findViewById(R.id.editMC);
        SSIDfield = (EditText)findViewById(R.id.editText1);
        passwordField = (EditText)findViewById(R.id.editText2);
        passwordField2 = (EditText)findViewById(R.id.editText3);
        mastercodeField.setHintTextColor(Color.rgb(65, 183, 216));
        SSIDfield.setHintTextColor(Color.rgb(65, 183, 216));
        passwordField.setHintTextColor(Color.rgb(65, 183, 216));
        passwordField2.setHintTextColor(Color.rgb(65, 183, 216));
        try {
            getIntent();
            backButton.setOnClickListener(new View.OnClickListener() {
                @Override
                public void onClick(View v) {
                    SetScreenActivity.this.finish();
                }
            });
            doneButton.setOnClickListener(new View.OnClickListener() {
                @Override
                public void onClick(View v) {
                    getInput();
                    setNewSSIDPassword();
                }
            });
            mastercodeField.addTextChangedListener(fieldWatcher);
            SSIDfield.addTextChangedListener(fieldWatcher);
            passwordField.addTextChangedListener(fieldWatcher);
            passwordField2.addTextChangedListener(fieldWatcher);
        } catch(Exception e) {
            Log.e("ERROR", "ERROR: " + e.toString());
            e.printStackTrace();
        }
    }


    @Override
    public boolean onCreateOptionsMenu(Menu menu) {
        // Inflate the menu; this adds items to the action bar if it is present.
        getMenuInflater().inflate(R.menu.set_screen, menu);
        return true;
    }
Line 10 disables the
doneButton as soon as it is instantiated. This is so the user will not be able
to submit
the CGI command to the FlashAir until each parameter of the CGI command has some input.
This
will help to avoid errors when the CGI command is executed.
In lines 11-18, we identify the text input fields and provide the text hint that is displayed on the fields (until the user provides input).
In lines 34-37, we add our
fieldWatcher to each of the text fields so the app will be aware whenever the
user provides
or removes input.
Getting Text Input
The following function will capture the user's text input. This function is called by the
onClick() function that is attached to the
doneButton. Only after
fieldWatcher detects that the user has input text into all four
EditText fields will the actual text be captured and stored.
SetScreenActivity.java (3)
    public void getInput() {
            mastercode = mastercodeField.getText().toString();
            newSSID = SSIDfield.getText().toString();
            newPassword = passwordField.getText().toString();
            newPassword2 = passwordField2.getText().toString();
    }
Confirming Input Passwords Match
In order to avoid typos when entering the new network password, this application requires the user to type in the password twice and then checks to see if the two entries match. The following function checks to see if the two password entries match, and if so, will indicate that it is safe to proceed with the CGI command.
SetScreenActivity.java (4)
    public Boolean passwordConfirmed() {
        if(newPassword.equals(newPassword2)) {
            return true;
        }
        return false;
    }
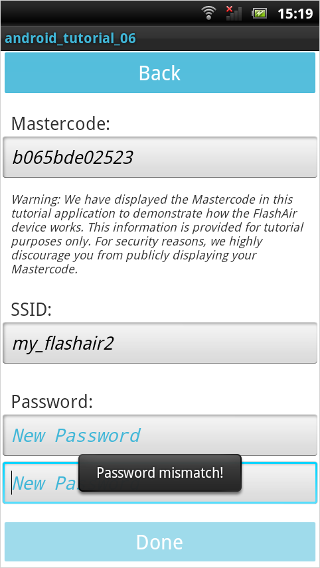
If
passwordConfirmed() returns
false, the function implemented below (
setNewSSIDPassword()) will clear the password input fields (disabling the
doneButton) and show a
Toast to indicate to the user that there was a password mismatch:
Setting the SSID & Network Password
The following function sends the CGI command to the FlashAir device and handles its
response. It
calls the above
passwordConfirmed() function before it makes the request to ensure that the
password is
correctly typed.
We will use the following CGI command to set the SSID:
-
config.cgiwith the Mastercode and new SSID as parameters-
If Mastercode = 0123456789AB and SSID = flashair, the command will look like
this:
http://flashair/config.cgi?MASTERCODE=0123456789AB&APPSSID=flashair -
The command will return the following data:
-
SUCCESSif the FlashAir SSID was successfully changed -
ERRORif the FlashAir SSID change failed
-
-
If Mastercode = 0123456789AB and SSID = flashair, the command will look like
this:
We will use the following CGI command to set the network password:
-
config.cgiwith the Mastercode and new network password as parameters-
If Mastercode = 0123456789AB and password = 12345678, the command will look
like this:
http://flashair/config.cgi?MASTERCODE=0123456789AB&APPNETWORKKEY=12345678 -
The command will return the following data:
-
SUCCESSif the FlashAir network password was successfully changed -
ERRORif the FlashAir network password change failed
-
-
If Mastercode = 0123456789AB and password = 12345678, the command will look
like this:
We will combine these commands in the function below to become:
http://flashair/config.cgi?MASTERCODE=0123456789AB&APPNETWORKKEY=12345678&APPSSID=flashair
The new SSID must be between 1 and 32 characters and the new password must be between 8 and 64 characters. If either of these conditions fail, the CGI command will fail.
To execute this CGI command, we will reuse the FlashAirRequest.java file from Android Tutorial 3: Downloading Content:
SetScreenActivity.java (5)
public void setNewSSIDPassword() {
    if(passwordConfirmed()) {

        // If passwords match, do HTTP command, catch and display if command fails
        new AsyncTask<String, Void, String>(){
            @Override
            protected String doInBackground(String... params) {
                return FlashAirRequest.getString(params[0]);
            }
            @Override
            protected void onPostExecute(String result) {
                if(result.toUpperCase(Locale.getDefault()).equals("SUCCESS")) {
                    Toast.makeText(SetScreenActivity.this, "Remember to reconnect to your FlashAir device using the new SSID and password!", Toast.LENGTH_LONG).show();
                    SetScreenActivity.this.finish(); // Go back to Get screen
                }
            }
        }.execute("http://flashair/config.cgi?MASTERCODE=" + mastercode + "&APPNETWORKKEY=" + newPassword + "&APPSSID=" + newSSID);
    }
    else {
        // If passwords don't match, display toast
        Toast.makeText(this, "Password mismatch!", Toast.LENGTH_SHORT).show();
        passwordField.setText("");
        passwordField2.setText("");
    }
}
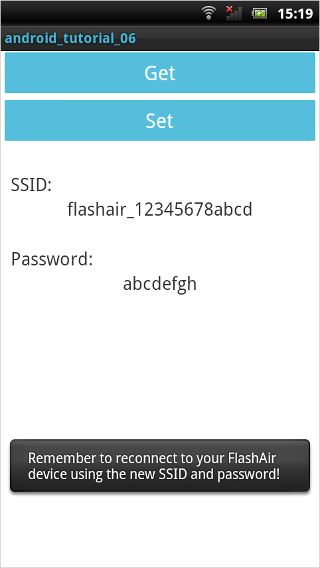
In line 13, we have set a
Toast to remind the user that they will have to reconnect to the FlashAir
device. Even
though the screen will change and return to the first screen (containing the old SSID and
password
data), the
Toast will still be visible for some time:
At line 14, we set the function to end the current
Activity and return to the first screen (
class MainActivity) once the new SSID and password are set.
If the CGI command is successful, the Android device will no longer be connected to the FlashAir via Wireless LAN since the FlashAir's SSID and network password have been changed.
Result
Toast will be shown to the screen like this:
Once the user reconnects to the FlashAir, pressing "Get" in the app will retrieve the newly changed SSID and network password:
Sample Code
android_tutorial_06.zip (532KB)
All sample code on this page is licensed under BSD 2-Clause License
 FlashAir™ Developers